Nails Reimagined: Acrylic Nail Art for Strength, Style, and Creativity
Nails are more than a beauty statement—they’re a form of self-expression. Acrylic nails are a popular choice for those who want long, durable, and strong nails. These artificial nails not only enhance length but also serve as the perfect canvas for a variety of creative nail art designs. When combined, acrylic nails and nail art provide endless opportunities for personal expression, beauty, and individual style.
What Are Acrylic Nails?
Acrylic nails are made by combining a liquid monomer and a powdered polymer to create a hard, protective layer applied over natural nails. This mixture forms a durable extension that is perfect for those with weak, short, or brittle nails. Once applied, the acrylic hardens into a strong coating that can be filed, shaped, and decorated as desired.
These nails can be customized into various shapes such as square, almond, oval, coffin, or stiletto, depending on your personal preference or current trend. They’re especially popular among individuals who struggle with nail breakage or want to maintain a flawless manicure for extended periods.
The application process involves placing the acrylic mixture onto the natural nail or a plastic nail tip. After shaping and smoothing, the acrylic hardens either through air drying or with the help of a UV or LED lamp. The strength and smoothness of acrylic nails make them the ideal foundation for any kind of nail art—from minimal to elaborate.
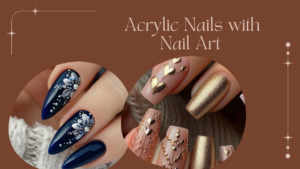
The Allure of Nail Art
Nail art has evolved from a simple polish to an expressive art form. It allows individuals to showcase their mood, creativity, and style preferences. When applied over acrylic nails, nail art becomes even more vibrant and durable.
Popular types of acrylic nail art include:
Hand-Painted Designs: Floral motifs, geometric patterns, characters, or even miniature portraits can be carefully painted onto the nails.
3D Nail Art: This involves using small accessories such as rhinestones, pearls, beads, or metallic charms to create raised, textured looks.
French Tips & Ombré Effects: Acrylic nails provide a strong, smooth surface for these timeless styles, helping them last longer and appear more refined.
Nail Stickers and Decals: Ideal for beginners or quick designs, these ready-made options allow for easy application and a polished finish.
You can mix and match these techniques for seasonal looks, weddings, festivals, or everyday elegance. Acrylic nails give the freedom to explore your creativity without the fear of smudging or early chipping.
How to Apply Acrylic Nails with Nail Art
Follow this simplified guide to achieve professional-looking acrylic nails with art:
Materials Needed:
Acrylic powder & liquid monomer
Nail tips (optional)
Primer & nail bond
Nail tools (brushes, dotting tools, rhinestones, stickers)
UV/LED lamp (if using gel polish)
Base coat & top coat
Steps:
Prep the Nails: Clean the nails, remove old polish, push back cuticles, and lightly buff the surface.
Apply Primer: Helps the acrylic adhere securely to the natural nail.
Attach Nail Tips (Optional): Choose your desired length and shape, and glue on the tips.
Create the Acrylic Bead: Dip the brush into monomer first, then into the powder. Apply the bead to the nail and sculpt it evenly.
Shape and File: After the acrylic sets, file the nails to perfect the shape and smooth the surface.
Decorate with Nail Art: Use your tools, stickers, or accessories to bring your nail design to life.
Seal with Top Coat: Apply a clear top coat and cure it if using gel. This helps protect the design and adds shine.
Benefits of Acrylic Nails with Nail Art
Durability: Acrylic nails resist chips, cracks, and breakage.
Customization: You can express your unique style with endless design possibilities.
Long-Lasting Results: A well-maintained acrylic set can last 2–3 weeks or longer.
Nail Protection: Acrylics create a shield over natural nails, allowing them to grow stronger underneath.
Conclusion
Nails are a creative outlet, and combining acrylic nails with nail art is the perfect way to express personal style while enjoying long-lasting beauty. Whether you’re into classic French tips or bold, jeweled 3D designs, acrylic nails give you the freedom to experiment and elevate your look. With the right tools and simple steps, salon-worthy results are just a DIY away.