Mehasa

elegance

STYLE GUIDE, elegance, fashion

Mastering Lighter Color Combinations: A Guide to Using the Color Wheel Effectively

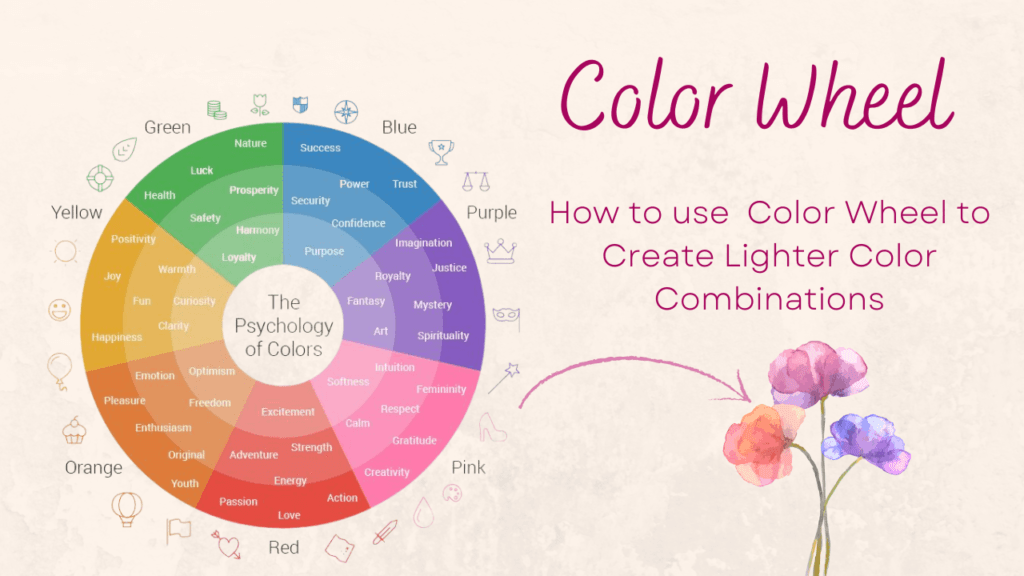
Using the Color Wheel to Create Lighter Color Combinations: A Step-by-Step Guide with Examples The color wheel is an essential tool for selecting harmonious color combinations in design. When creating lighter color schemes, it becomes a powerful guide for selecting colors that are visually soft, balanced, and calming. By understanding how to use the color wheel with lighter shades, you can craft beautiful palettes that are both appealing and tranquil. Below, we’ll walk through how to use the color wheel to build lighter combinations, complete with examples. 1. Start with a Base Color Every color palette begins with a base color, which acts as the foundation for your design. This base can be any primary color, secondary color, or more complex hue, and it sets the tone for the rest of your color scheme. Example:Let’s say you choose blue as your base color. Blue is calming and versatile, making it an excellent starting point for lighter combinations. 2. Use Lighter Tints of Your Base Color One of the simplest ways to create a lighter color palette is through tinting—the process of adding white to your base color. The more white you add, the lighter and softer the color becomes. This method produces pastel hues that are perfect for creating light and airy color schemes. Example:If your base color is blue, you can create lighter tints such as: Sky Blue (a soft, light blue with a calm feeling) Powder Blue (a very light, almost pastel blue) Baby Blue (a gentle and soothing light blue) These tints will make your design feel light and airy while still retaining the essence of the blue hue. 3. Explore Analogous Colors for Harmony Analogous colors are colors that sit next to each other on the color wheel. These colors naturally complement each other and create a harmonious, cohesive look when used together. When working with lighter tints, analogous colors allow for a gentle, flowing design. Example:If you’ve chosen blue as your base color, consider pairing it with lighter tints of green and purple, which are next to blue on the color wheel: Light Green (a soft, pastel green) Lavender (a light, soft purple) Together, these analogous colors will create a soothing, monochromatic palette that feels naturally connected and harmonious. The lighter versions of these colors won’t overpower each other, resulting in a peaceful design. 4. Pair Complementary Colors with Light Tints Complementary colors are those located directly opposite each other on the color wheel. Typically, they create bold contrast when used together. However, when working with lighter tints, complementary colors can provide a soft yet visually stimulating combination. Example:If you’re using blue as your base color, the complementary color on the color wheel is orange. To keep the combination light and soft, you can pair a light blue with a pale orange or peach: Light Blue (a soft blue tint) Peach (a soft, pastel orange) These two colors create a balanced contrast, with the cool blue paired with the warm, soft orange. The lighter tints help maintain visual interest without the harshness of full-saturation complementary colors. 5. Consider a Monochromatic Approach A monochromatic color scheme involves using different shades, tints, or tones of a single base color. This creates a cohesive and unified palette, and when using lighter tints, it can result in a gentle, sophisticated design. Example:If your base color is light blue, you can create a monochromatic scheme by exploring various lighter versions: Baby Blue (a light, pastel blue) Powder Blue (a slightly lighter, softer blue) Pale Turquoise (a blue-green mix in a soft, muted tone) By using these different shades of light blue, you maintain a uniform look throughout the design, with each shade flowing naturally into the next. 6. Incorporate Neutrals for Balance While lighter colors are often delicate and subtle, incorporating neutral colors can help ground the palette and add depth. Neutrals like white, beige, light gray, or soft taupe allow your lighter colors to pop without overwhelming the design. Example:If you’re using a light pastel palette (like soft pinks, blues, and purples), pair these with a neutral background color such as: Light Gray (a soft, neutral backdrop that complements pastel tones) Cream (a warm, off-white that works well with lighter hues) These neutrals will provide balance and contrast to the lighter, softer colors, preventing the design from feeling too “washed out.” 7. Test and Adjust Your Color Combinations Once you’ve chosen your colors, it’s important to test them together in your design to see how they interact. Sometimes, even lighter colors might clash, or the palette may need further adjustments to achieve the right balance. Example:After pairing light blue with peach (complementary colors), you might find that the contrast is too stark. To adjust, you could choose a more muted peach or even introduce a neutral like light beige to soften the combination further. Testing your palette allows you to ensure that your color scheme feels cohesive and visually pleasing. Conclusion Using the color wheel to create lighter color combinations is a fantastic way to achieve harmonious, calming designs. Whether you’re working with analogous colors, complementary colors, or exploring a monochromatic scheme, the key to success lies in selecting light tints and balancing them carefully. By incorporating neutral tones and testing your combinations, you can create a visually soothing palette that evokes tranquility and elegance. With these strategies and examples, you’ll be able to design stunning light color schemes that are both beautiful and balanced. Happy designing!

BEAUTY SECRATES, elegance, fashion, STYLE GUIDE

How to Dress Up According to the Color Wheel

  How to Dress Up According to the Color Wheel: A Stylish Guide to Harmonizing Your Wardrobe Dressing according to the color wheel is a simple yet powerful way to elevate your style. By understanding how colors interact, you can create outfits that are visually appealing, balanced, and complementary to your skin tone. The color wheel helps you understand which colors work well together and how to create cohesive, flattering looks for any occasion. In this guide, we’ll show you how to use the color wheel to dress in a way that enhances your natural features, boosts your confidence, and makes you stand out in a good way! What is the Color Wheel? The color wheel is a circular diagram that shows the relationships between colors. It’s divided into: Primary Colors: Red, Blue, Yellow. Secondary Colors: Orange, Green, Purple (created by mixing two primary colors). Tertiary Colors: Combinations of primary and secondary colors, like red-orange, blue-green, etc. Understanding how to use the color wheel effectively can help you make sense of color theory and choose color combinations that are visually balanced and complementary. 1. Complementary Colors: Bold and Eye-Catching Combinations Complementary colors are located directly across from each other on the color wheel. When paired together, they create contrast and make each other appear more vibrant. This color combination is perfect for making a bold statement. Examples of Complementary Color Pairs: Red & Green Blue & Orange Yellow & Purple How to Dress in Complementary Colors: Red & Green: Try a bright red dress with green accessories (a green bag or shoes) for a lively, festive look. This is great for Christmas-themed parties or any occasion where you want to stand out. Blue & Orange: A royal blue dress paired with orange accessories (like a belt or shoes) creates a striking, energetic look. This combination works well for casual outings or summer parties. Yellow & Purple: A yellow dress with purple accessories (like a purple scarf or shoes) gives off a fun, vibrant vibe. This works well for evening events or a fashion-forward statement. Best for: Events where you want to stand out and create visual interest, such as parties, festivals, or casual get-togethers. 2. Analogous Colors: Harmonious and Subtle Pairings Analogous colors are next to each other on the color wheel and create a harmonious, visually pleasing look. These combinations are softer and more relaxed, making them great for day-to-day wear or more professional settings. Examples of Analogous Color Combinations: Red, Red-Orange, Orange Blue, Blue-Green, Green Yellow, Yellow-Green, Green How to Dress in Analogous Colors: Red, Red-Orange, and Orange: A coral dress with red accessories creates a warm, vibrant look without clashing. This combination is perfect for a brunch or a relaxed, daytime event. Blue, Blue-Green, and Green: A teal dress with green jewelry or a blue-green top with navy pants creates a cool, calming look. This combination works great for professional settings or casual outings. Yellow, Yellow-Green, and Green: A soft yellow dress with green accessories or a yellow-green blouse with olive pants creates a fresh, natural vibe. This is ideal for spring or garden parties. Best for: Casual outings, professional wear, or events where you want a cohesive and elegant look. 3. Triadic Colors: Bold and Balanced Combinations Triadic colors are evenly spaced around the color wheel and form a triangle. These combinations are vibrant, but because they are balanced, they don’t overwhelm the eyes. Triadic color schemes are perfect when you want to stand out without being too dramatic. Examples of Triadic Color Combinations: Red, Yellow, Blue Purple, Orange, Green How to Dress in Triadic Colors: Red, Yellow, and Blue: A yellow dress with red and blue accessories (like a red belt and blue shoes) creates a bold, colorful look. This combination is ideal for a fun, lively event where you want to express creativity. Purple, Orange, and Green: A purple top paired with orange pants and green accessories creates a bold, energetic vibe. This look is perfect for art-related events, creative work environments, or a fashion-forward gathering. Best for: Creative events, parties, or any occasion where you want to show off your vibrant personality. 4. Monochromatic Colors: Sleek and Elegant Monochromatic color schemes involve using different shades, tints, or tones of a single color. This results in a sophisticated, sleek look with subtle variations in hue. It’s an elegant approach that doesn’t require too much thought but still delivers a stylish impact. Examples of Monochromatic Color Schemes: Light Blue, Blue, Navy Blue Pink, Light Pink, Burgundy How to Dress in Monochromatic Colors: Light Blue, Blue, and Navy Blue: A navy blue dress with a light blue scarf or jacket creates a sleek, monochromatic look. This works well for formal events or professional settings. Pink, Light Pink, and Burgundy: A soft pink blouse with burgundy pants and a light pink handbag makes for an elegant and cohesive outfit that’s perfect for daytime wear or a date. Best for: Office wear, formal events, or anytime you want a refined and polished look. 5. Split-Complementary Colors: Balanced but Vibrant Split-complementary colors are a variation of complementary colors, where you use the two colors adjacent to the complementary color. This results in a high-contrast look without being too overpowering. Examples of Split-Complementary Pairs: Blue, Yellow-Orange, Red-Orange Green, Red-Purple, Blue-Purple How to Dress in Split-Complementary Colors: Blue, Yellow-Orange, and Red-Orange: A blue dress with yellow-orange accessories and red-orange shoes creates a playful and balanced look. This combination is perfect for evening parties or any social gathering where you want to make a statement. Green, Red-Purple, and Blue-Purple: A green dress with red-purple earrings and a blue-purple handbag creates an unexpected yet stylish color combo. This look is ideal for events where you want to show off a unique sense of style. Best for: Evening events, social gatherings, or anytime you want to make an impression with a balanced yet bold look. Tips for Dressing According to the Color Wheel: Know Your Skin Tone: Understanding whether you have a warm,

skin, STYLE GUIDE

Master How to Check Your Skin’s Undertone

How to Check Your Skin’s Undertone: A Complete Guide to Determining Your Skin Tone and Skin’s Undertone Understanding how to check your skin’s undertone is essential for making the right choices in your wardrobe, makeup, and accessories. Your skin’s undertone is the subtle hue beneath the surface of your skin that influences how different colors look on you. Here’s how to check your skin’s undertone and combine it with your skin tone for the best results. 1. Determining Your Skin Tone Your skin tone is determined by the amount of melanin in your skin and how it reacts to sunlight, but your skin’s undertone plays a more significant role in which colors look best on you. Here are the basic categories of skin tone: Fair Skin: Pale, burns easily, and rarely tans. Typically has pink or blue undertones in the skin’s undertone. Medium Skin: Beige or olive tone, tans in the summer, with either warm or neutral skin’s undertones. Dark Skin: Ranges from rich brown to deep ebony, with either cool or warm skin’s undertones. To determine your skin tone and check your skin’s undertone: Look at Your Skin in Natural Light: Natural daylight helps you assess both your skin’s undertone and overall appearance, allowing you to identify your skin’s undertone more accurately. Check the Veins on Your Wrist: Under natural light, observe your veins. If they appear: Blue/Purple: You likely have cool undertones in your skin’s undertone. Green: You likely have warm undertones in your skin’s undertone. Neither Blue nor Green: You may have neutral undertones in your skin’s undertone. 2. How to Check Your Skin’s Undertone Your skin’s undertone remains constant and does not change with the seasons or sun exposure. Here are the best ways to check your skin’s undertone: Method 1: The Vein Test Look at the veins on your wrist under natural light. If your veins appear: Blue/Purple: You likely have cool undertones in your skin’s undertone. Green: You likely have warm undertones in your skin’s undertone. Neither Blue nor Green: You may have neutral undertones in your skin’s undertone. Method 2: The Jewelry Test Hold both silver and gold jewelry up to your skin and check how they interact with your skin’s undertone: Silver Jewelry: Complements cool undertones in your skin. Gold Jewelry: Looks better on warm undertones in your skin. If both jewelry types look flattering, you likely have neutral undertones. This test helps you understand how different jewelry enhances your skin’s undertone, allowing you to choose accessories that suit your skin’s undertone best. Method 3: The White Paper Test Take a piece of pure white paper and hold it next to your face in natural light to check your skin’s undertone: Pink, Rosy, or Blue Skin: You likely have cool undertones in your skin’s undertone. Yellow, Peachy, or Golden Skin: You likely have warm undertones in your skin’s undertone. Combination of Both: You probably have neutral undertones in your skin’s undertone. Method 4: The Sun Test Check how your skin’s undertone reacts in the sun: Burns Easily: Cool undertones in your skin’s undertone. Tans Easily, Doesn’t Burn: Warm undertones in your skin’s undertone. Burns and Tans Equally: Neutral undertones in your skin’s undertone. 3. Combining Skin Tone and Undertone Now that you know how to check your undertone, pair it with your complexion to find the most flattering colors. Here’s how to match your complexion with your undertone: Fair Skin with Cool Undertones: Looks great in pastel pinks, lavender, icy blue, and jewel tones like emerald green or royal blue. Fair Skin with Warm Undertones: Shine in coral, peach, camel, mustard yellow, and warm reds. Medium Skin with Cool Undertones: Fabulous in royal blue, deep purple, and cool greens like emerald. Medium Skin with Warm Undertones: Go for earthy tones like burnt orange, olive green, and deep yellow that complement your undertone, enhancing your overall look. Dark Skin with Cool Undertones: Bold colors like cobalt blue, sapphire, and jewel tones like ruby red complement your complexion beautifully. Dark Skin with Warm Undertones: Earthy hues like terracotta, mustard, and rich browns highlight your natural undertone. 4.Tips for Choosing Clothes Based on Your Undertone Recognizing your undertone makes it easier to choose the most flattering colors for your wardrobe: Cool Undertones: Opt for cool hues like blues, purples, and cool greens, and steer clear of warm colors like oranges or yellows. Warm Undertones: Go for warm shades such as yellows, oranges, reds, browns, and warm greens. Neutral Undertones: You can wear both cool and warm colors, but medium shades like jade green, blush pink, and turquoise will best complement your undertone. Conclusion Understanding your undertone is an easy yet impactful step in choosing the most flattering clothes, makeup, and accessories. By recognizing both your complexion and undertone, you’ll be able to select colors that highlight your natural beauty, increase your confidence, and make you feel radiant in everything you wear.

elegance, BEAUTY SECRATES, fashion, STYLE GUIDE

How to Dress for an Hourglass Body Shape: A Comprehensive Style Guide

How to Dress for an Hourglass Body Shape: A Comprehensive Guide The hourglass body shape is often considered the epitome of balanced proportions. Characterized by a well-defined waist with curvier bust and hip measurements, an hourglass figure is timelessly admired for its feminine silhouette. But dressing an hourglass body isn’t about simply following trends; it’s about highlighting your natural curves while creating a harmonious balance that flatters your shape. Whether you prefer ethnic outfits, western wear, or accessories that enhance your look, there are numerous ways to style your wardrobe to embrace your figure and feel confident. Understanding the Hourglass Body Shape Before diving into the details of how to dress an hourglass figure, it’s important to understand what makes it unique. The key feature of an hourglass body is the proportional balance between the bust and hips, with a narrower waist that creates an ‘X’ or hourglass shape. Women with this body type often have a curvy, feminine silhouette with a defined waistline and fuller bust and hips. The goal of dressing an hourglass figure is to highlight these natural curves, while making sure you don’t overwhelm your frame with ill-fitting clothes. The right outfit will make your proportions look balanced, emphasizing your curves in all the right places. Key Tips for Dressing the Hourglass Body Shape Emphasize the Waistline One of the defining features of an hourglass body is the narrow waist. To showcase this feature, opt for clothing that draws attention to your waist. This can be done by wearing outfits that cinch at the waist or adding a belt to an outfit. Dresses with built-in waistbands or high-waisted trousers are great options. Even a shirt with a knot tied at the waist can accentuate your curves. Choose Tailored and Fitted Clothing Hourglass figures look amazing in tailored, fitted clothing that follows the natural curve of the body. A well-tailored outfit helps to define your shape without overwhelming it. Loose or baggy clothes may hide your curves and create a boxy look. Fitted tops, dresses, and trousers that gently hug the body can help you show off your curves in a balanced way. Opt for V-necklines and Scoop Necklines When it comes to tops and dresses, V-necklines and scoop necklines are ideal for hourglass body shapes. These necklines elongate the neck, create a slimming effect, and draw attention to the upper part of your body without overwhelming the bust. Avoid high necklines like turtlenecks, as they can hide your natural curves and make your bust look broader. A-line and Pencil Skirts Both A-line and pencil skirts are flattering for hourglass figures. A pencil skirt will hug your hips and waist, enhancing your curves, while an A-line skirt offers more flow, balancing out the proportions between your hips and waist. Choose skirts that fall just below the knee to further elongate your legs. Structured Outerwear Coats and jackets with structure are key when dressing an hourglass body. Opt for tailored blazers, structured coats, or jackets that cinch at the waist to maintain a smooth, hourglass silhouette. Avoid oversized outerwear, as it may hide your curves and make your frame appear boxy. Dressing for an Hourglass Body Shape: Ethnic Outfits Ethnic outfits can look stunning on hourglass figures when styled correctly. The beauty of ethnic wear lies in its diversity, providing a wide range of silhouettes and fabrics that work wonderfully for different body types. Below are some of the best ethnic styles for hourglass figures. 1. Sarees Sarees are iconic ethnic garments that can be draped to accentuate your curves, and they work beautifully on hourglass figures. The key to wearing a saree with an hourglass shape is selecting a style that defines your waist while highlighting your bust and hips. Choose a fitted blouse: A fitted blouse that cinches at the waist will emphasize your curves. Opt for blouses with deep necklines or sweetheart necklines that flatter your bust. Opt for a high-waisted drape: When draping the saree, try to pleat it slightly higher on the waist to give a clean, structured look that highlights your waistline. Tailored drapes: The saree should not be overly loose or bulky. A well-tailored saree with neat pleats will highlight your figure and create a sleek and flattering look. 2. Lehengas and Cholis Lehengas and cholis are another popular ethnic outfit that complements the hourglass figure. The key is to focus on defining your waist and enhancing your curves. High-waisted lehengas: Opt for a high-waisted lehenga to accentuate your waist and legs. A long, flowing lehenga with a well-fitted choli will balance the curves while maintaining an elegant look. Peplum-style cholis: A peplum-style choli is a great option as it will add volume to the upper body while cinching at the waist, creating a balanced silhouette. Fit and flare designs: These styles are ideal for hourglass figures, as they highlight the curves without making the body look too top-heavy. 3. Anarkali Suits Anarkali suits, known for their flared bottom, are perfect for hourglass figures as they emphasize the bust and waist while creating a balanced flow from the waist down. Fitted bodices: Look for Anarkalis with fitted bodices that will hug your waist and define your curves. A high-neck or boat-neck style can be very flattering. Flowing silhouette: The flowy skirt portion of the Anarkali should start from the waist or slightly below to maintain a proportionate, elegant look. 4. Sharara and Palazzo Sets Sharara and palazzo pants paired with a well-fitted tunic or kurta work wonders for hourglass figures. The key here is to balance the volume of the lower half with a form-fitting upper garment. Tailored tops: Pair your shararas or palazzos with fitted tops or kurtas that define your waist. A tunic that is cinched at the waist with a belt or drawstring can enhance your natural curves. Flowy but fitted: While the bottom portion can be wide and flowy, the upper portion should be more structured to keep your proportions in check. Dressing for an Hourglass

elegance, BEAUTY SECRATES, nails

Professional Manicure Guide: Step-by-Step for Salon-Worthy Nails

Achieving a salon-quality manicure at home is easier than you might think. With the right tools, a little patience, and following the right steps, you can achieve flawless nails without leaving your house. This step-by-step guide will walk you through everything from using a manicure tub for soaking, to incorporating a nail drill kit for precision shaping, and even using a UV lamp for gel polish. Let’s dive in! What You’ll Need: Before starting your at-home manicure, gather the following tools and products: Nail polish remover Cotton pads Nail clippers Glass or crystal nail file Cuticle pusher or orangewood stick Cuticle oil Hand scrub or exfoliator Manicure tub (for soaking) Base coat Nail polish (your choice of color) Top coat Electric nail drill kit with various bits Drill bits: cuticle bit, sanding band, shaping bit, etc. Hand towels or cotton pads Hand moisturizer and cuticle oil Optional: Nail buffer, UV/LED lamp, and nail gel polish (for gel manicures) Step 1: Remove Old Nail Polish Start with a clean slate by removing any old nail polish. Use nail polish remover and soak a cotton pad. Gently wipe away any traces of polish, ensuring your nails are ready for a fresh coat. Tip: Non-acetone removers are gentler and less drying for your nails, especially if you have weak or brittle nails. Step 2: Clean and Exfoliate Your Hands Cleaning and exfoliating your hands is essential for healthy nails. Wash your hands thoroughly with a gentle hand soap like CeraVe Hydrating Cleanser to remove dirt and oil. Exfoliate your hands with a hand scrub like The Body Shop Mango Body Scrub to remove dead skin cells, leaving your skin smooth. Soak your hands in a manicure tub filled with warm, soapy water for 5-10 minutes. You can add a little cuticle softener to the water or use Lush Lemon Flutter Cuticle Butter to soften and hydrate your cuticles. Tip: A manicure tub is great for relaxing your hands and nails, mimicking a salon experience at home. This step helps soften the cuticles for easier pushing back later. Step 3: Trim and Shape Your Nails Now that your hands are clean and soft, it’s time to trim and shape your nails. Trim your nails using sharp nail clippers to the desired length. Cut them straight across to avoid ingrown nails. File your nails with a glass nail file (or crystal file). Shape them according to your preference—square, oval, or almond. Tip: Always file in one direction to avoid damaging the nail’s edges. Glass files are gentler on nails than metal files. Step 4: Use a Nail Drill Kit (Step for Precision Shaping and Cuticle Work) The nail drill kit helps you achieve precise shaping and smooth out your nails and cuticles, similar to a professional salon manicure. It’s especially useful for cleaning and refining your nail edges. Attach the correct drill bit: Use the sanding band for smoothing the surface of the nail, the cuticle bit for cleaning up around the cuticles, and a shaping bit to refine the nail edges. Start with a low speed: Gently run the drill around the cuticle area to push back the cuticles and remove excess skin. Shape your nails with the sanding band or shaping bit to smooth any rough edges or uneven surfaces. Tip: Be sure to use the lowest speed when starting, and gradually increase the speed as you get more comfortable with the tool. Always keep the drill moving to avoid applying too much pressure to one spot. Step 5: Push Back Cuticles After using the drill for precision work, it’s time to finish up your cuticle care. Apply a cuticle remover like Sally Hansen Instant Cuticle Remover to soften the cuticles. Gently push back your cuticles with a cuticle pusher or orangewood stick. Be careful not to push too hard to avoid irritation or injury. Tip: Never cut your cuticles as it may lead to infections or hangnails. Push them back gently and moisturize them with cuticle oil. Step 6: Buff and Smooth Nails (Optional) If you want a smooth, shiny nail surface, buff your nails gently. Buff the surface of your nails using a nail buffer. Buffing smooths out ridges and gives your nails a natural shine. Be sure to buff gently so as not to weaken the nail. Tip: Buffing is optional, but it helps create a smooth surface for nail polish, ensuring a long-lasting, flawless finish. Step 7: Apply Base Coat The base coat is essential for protecting your nails from staining and giving the polish something to adhere to. Apply a thin layer of base coat such as OPI Nail Envy. Allow the base coat to dry completely before moving on to the color. Tip: Be sure to cover the tips of your nails with the base coat to prevent premature chipping. Step 8: Apply Nail Color This is where the fun begins! Choose your favorite nail polish color. Apply the first coat of polish, using smooth strokes. Start in the center of the nail and work your way to the sides. Let the first coat dry before applying a second coat for full coverage and opacity. Tip: Always allow each coat to dry completely before applying the next to avoid smudging and streaking. Step 9: Apply Top Coat The top coat seals in your color, adds shine, and helps prevent chipping. Apply a generous layer of top coat like Sally Hansen Mega Shine or Seche Vite to give your nails a glossy, professional finish. Be sure to seal the tips of your nails with the top coat to prevent chipping. Tip: If you’re in a rush, use a quick-dry top coat to speed up the drying process. Step 10: Dry with UV Lamp (For Gel Polish) If you’re using gel polish for a longer-lasting finish, you’ll need a UV/LED lamp to cure the polish. After applying your gel base coat, gel color, and top coat, place your nails under a UV/LED lamp for the recommended curing time

elegance, BEAUTY SECRATES, nails

How to Do a Manicure at Home: A Step-by-Step Guide for Gorgeous Nails and Healthy Hands

How to Do a Manicure at Home: A Step-by-Step Guide for Gorgeous Nails and Healthy Hands A professional-quality manicure doesn’t require a trip to the salon. With the right tools, a little patience, and some self-care, you can achieve beautiful nails and soft, healthy hands from the comfort of your home. This step-by-step guide will walk you through everything from hand cleaning and bleaching to moisturizing and polishing your nails. What You’ll Need: Before you start, make sure you have all the necessary tools and products for a complete manicure: Nail polish remover Nail clippers Nail file Cuticle pusher or orangewood stick Cuticle oil Hand scrub or exfoliator Moisturizer (hand cream and cuticle oil) Base coat Nail polish (your chosen color) Top coat Towels or cotton pads Optional: Nail buffer, hand soak, and gloves for overnight moisturizing Lemon juice or hydrogen peroxide for bleaching (optional) Step 1: Remove Old Nail Polish Begin by removing any existing nail polish using a gentle nail polish remover. Use a cotton pad to wipe off all the old polish, cleaning each nail thoroughly. Tip: For a gentler approach, use a non-acetone remover, especially if you have sensitive nails. Step 2: Hand Cleaning and Washing Proper hand cleaning is essential for both hygiene and achieving the best manicure results. Start by washing your hands with a gentle hand soap like CeraVe Hydrating Cleanser. This will remove dirt, oils, and any leftover polish residue from your skin. Exfoliate Your Hands: Apply a hand scrub (like The Body Shop Mango Body Scrub) to your hands, massaging it gently to remove dead skin cells. This will leave your hands feeling soft and smooth, while also helping your nail polish go on more evenly. Soak Your Hands: If you want to relax and soften your cuticles, soak your hands in warm water for 5-10 minutes. You can add a few drops of Lush’s Lemon Flutter Cuticle Butter for extra hydration. Step 3: Bleaching (Optional) If your hands have dark spots or uneven skin tone, you can brighten them using natural or gentle bleaching methods: Lemon Juice: Lemon juice has natural bleaching properties. Simply apply fresh lemon juice to dark spots or uneven skin areas, leave it on for 5-10 minutes, and rinse off. Hydrogen Peroxide: For an alternative method, mix Hydrogen Peroxide 3% with water and apply it to the skin. Let it sit for a few minutes before washing it off to lighten the skin and reduce pigmentation. Tip: If you have sensitive skin, always patch-test these methods first to avoid irritation. Step 4: Trim and Shape Your Nails Now, focus on your nails. Use nail clippers to trim your nails to your desired length. If necessary, use a nail file to smooth out the edges. Filing in one direction prevents nail breakage and keeps the shape intact. Tip: Avoid cutting your nails too short, as this can lead to painful hangnails or ingrown nails. Step 5: Push Back Cuticles To keep your nails looking neat, push back your cuticles with a cuticle pusher or orangewood stick. Be gentle—never push too hard to avoid damage. If your cuticles are tough, apply a cuticle remover like Sally Hansen Instant Cuticle Remover and let it sit for a few moments before pushing them back. Moisturize the cuticles with cuticle oil such as CND SolarOil to keep them soft and nourished. Step 6: Buff and Smooth Nails (Optional) If you want to achieve a shiny, smooth nail surface, use a nail buffer like the Sephora Nail Buffer. Gently buff the top of each nail to remove any ridges, giving your nails a flawless, polished appearance. Avoid excessive buffing, as it can weaken your nails. Step 7: Apply a Base Coat Before applying your nail color, always start with a base coat. The base coat acts as a protective layer to prevent staining and helps the polish adhere better to the nail. Use a product like OPI Nail Envy for added strength and protection. Tip: Allow the base coat to dry completely before applying the nail polish for a smoother finish. Step 8: Apply Nail Polish Now it’s time to add color! Choose your favorite nail polish and apply it in thin, even layers. Start in the center of the nail, then move to the sides. Apply two thin coats of your chosen color to ensure full coverage. Tip: Be patient between coats to allow each layer to dry completely, preventing streaks and smudges. Step 9: Finish with a Top Coat Once your nail color is dry, apply a top coat like Sally Hansen Mega Shine for a glossy, long-lasting finish. The top coat not only adds shine but also helps prevent chipping, extending the life of your manicure. Tip: Seal the tips of your nails with the top coat to avoid early chipping. Step 10: Moisturize Your Hands and Nails After your nails are completely dry, finish off by moisturizing your hands and cuticles. Apply a rich hand cream such as Neutrogena Norwegian Formula Hand Cream to keep your hands hydrated and soft. Follow with cuticle oil to nourish the skin around your nails. Tip: For extra moisture, apply a thick layer of hand cream and wear cotton gloves overnight. Step 11: Let Your Nails Dry Completely The final step is crucial—let your nails dry completely before using your hands to avoid smudging or ruining the manicure. If you’re in a rush, you can use a quick-dry top coat or dip your nails into cold water to speed up the drying process. Conclusion With a little patience and the right tools, you can achieve a beautiful manicure at home that rivals a professional salon experience. By incorporating steps like hand cleaning, bleaching, moisturizing, and using quality products, your nails and hands will not only look great but also feel soft and healthy. Enjoy the satisfaction of a flawless manicure while pampering your hands from the comfort of your home!

elegance, nails

Press-On Nails: The Convenient and Stylish Solution for Beautiful Nails

Press-on nails have become one of the most convenient and popular alternatives to traditional nail salons. Whether you’re looking for a quick manicure, a budget-friendly option, or just a fun way to change up your nail look, press-on nails are the perfect solution. These easy-to-use nails offer a wide variety of designs, shapes, and sizes, giving you the flexibility to customize your nails at home with minimal effort. In this article, we will explore what press-on nails are, their benefits, how to apply them, and tips for maintaining them. What Are Press-On Nails? Press-on nails are pre-designed artificial nails that are made to fit over your natural nails. These nails are made from various materials, including acrylic, plastic, or gel, and are designed to mimic the look of professionally done manicures. They come in a variety of colors, designs, and shapes, from simple and elegant to bold and creative. The main appeal of press-on nails is their ease of use. Unlike traditional acrylic or gel nails, which require professional application and a longer time commitment, press-on nails can be applied quickly and without the need for special equipment or expertise. Benefits of Press-On Nails 1. Convenience and Time-Saving One of the greatest advantages of press-on nails is their convenience. Unlike traditional nail salon visits, which can take an hour or more, press-on nails can be applied in just 15 to 30 minutes. This makes them an ideal option for people who are short on time or need a quick manicure for an event or outing. 2. Affordable Press-on nails are much more affordable compared to professional salon manicures. A pack of high-quality press-on nails can last several uses, making them a cost-effective alternative for those who love experimenting with different nail looks without breaking the bank. 3. Variety of Designs Press-on nails come in a wide range of colors, patterns, and styles. Whether you prefer a minimalist, elegant look or want something more bold and dramatic, there’s a press-on nail design for every taste. You can find options with intricate nail art, glitter, French tips, or even 3D embellishments. 4. No Damage to Natural Nails When applied and removed correctly, press-on nails do not cause damage to your natural nails. Unlike acrylics or gels, which require filing and soaking, press-on nails are simply pressed onto the natural nail using adhesive, reducing the risk of harming your nails. 5. Temporary & Customizable Press-on nails are temporary and can be easily removed when you’re ready to change your look. You can also mix and match different sets to create a unique design or use different shapes and sizes based on your mood or occasion. How to Apply Press-On Nails Step 1: Prep Your Natural Nails Before applying press-on nails, make sure your natural nails are clean and dry. Start by removing any old polish and filing your nails to your desired shape. Push back your cuticles gently and ensure your nails are free of oils and dirt. Step 2: Choose the Right Size Press-on nails come in a variety of sizes. To ensure a comfortable and secure fit, choose a press-on nail for each of your natural nails that matches the size of your nail bed. Most press-on nail kits come with multiple sizes, so you can pick the perfect fit for each finger. Step 3: Apply Adhesive Apply the adhesive that comes with the press-on nails. Some press-on nails come with self-adhesive tabs, while others require you to apply nail glue. If you’re using nail glue, apply a thin layer to the back of the press-on nail, ensuring it covers the entire surface. Step 4: Press and Hold Press the press-on nail onto your natural nail and hold it firmly for about 10-20 seconds to ensure a strong bond. Make sure the press-on nail is positioned properly and is aligned with your cuticle. Step 5: Finish and Shape Once all the nails are applied, you can trim or file them to your desired length and shape. If necessary, you can add a top coat for extra shine and to seal the nails in place. How to Remove Press-On Nails Removing press-on nails is just as easy as applying them. Follow these steps to safely remove them without damaging your natural nails: 1. Soak in Warm Water: Soak your nails in warm water for 10-15 minutes to soften the adhesive. 2. Gently Lift: Use a wooden stick or cuticle pusher to gently lift the edge of the press-on nail. Start from the side and work your way around the nail until it loosens. 3. Clean Your Nails: After removal, clean your nails with nail polish remover to remove any remaining adhesive. Tips for Maintaining Press-On Nails Avoid Water: After applying press-on nails, avoid getting them wet for at least an hour to ensure the adhesive fully sets. Be Careful with Impact: Press-on nails are durable, but excessive pressure or impact can cause them to lift or break. Try to avoid activities that could damage your nails. Reapply as Needed: If any nails begin to lift, simply reapply them with fresh adhesive. Moisturize: Apply cuticle oil to keep your natural nails and the surrounding skin moisturized. Popular Press-On Nail Designs Press-on nails are available in a variety of creative designs, some of the most popular include: Classic French Manicure: The timeless French tip design is available in press-on versions, offering an elegant and clean look. Glitter and Metallic Designs: Perfect for special occasions, glitter and metallic press-on nails add sparkle and shine to your fingertips. Floral Patterns: Floral press-on nails give a soft and feminine touch, with intricate designs that are perfect for spring or summer. Marble Effect: For a sophisticated and trendy look, marble-effect press-on nails mimic the elegance of marble stone. Animal Prints: Animal print designs such as leopard spots, zebra stripes, and snake patterns are bold choices for making a statement. Conclusion Press-on nails offer a fast, affordable, and stylish way to achieve beautiful nails at home. With a

elegance, nails

Dip Powder Nails

Everything You Need to Know About Dip Powder Nails Dip powder nails have gained popularity as a long-lasting and vibrant alternative to traditional nail polish and gel manicures. Known for their durability and variety of colors, dip powder nails have become a go-to choice for many nail enthusiasts. If you’re new to the world of dip powder nails, here’s a detailed look at what they are, the benefits, and the step-by-step process for achieving a flawless set at home.  What Are Dip Powder Nails? Dip powder nails are created using a specialized powder that is applied to the nail in layers, creating a smooth and thick finish. The process involves dipping the nails into the powder or sprinkling it onto the nail after applying a bonding liquid. The layers of powder are hardened with the help of a bonding agent and activator, resulting in a highly durable and long-lasting manicure. Unlike gel nails, which require UV light to cure, dip powder nails are air-dried, making them a safer alternative to UV exposure. Additionally, dip powder nails are more resistant to chips and cracks, making them ideal for those who need a manicure that can last up to three weeks.  Benefits of Dip Powder Nails 1. Long-Lasting Results: Dip powder nails are known for their longevity. With proper care, they can last between 2-4 weeks without chipping or peeling. 2. Strengthening: The powder creates a thick layer over your natural nails, providing extra strength and protection, which is great for people with brittle or weak nails. 3. Variety of Colors and Finishes: Dip powders come in a wide range of shades, from bold colors to subtle neutrals, as well as unique textures like glitter or matte finishes. 4. Healthier Nails: Since dip powder nails don’t require UV light, they may be a healthier alternative to other types of manicures, especially when done properly. 5. Minimal Dry Time: The process is relatively fast, and there’s no need to wait for nails to dry under a lamp, making it a more efficient option compared to gels.  Method for Applying Dip Powder Nails Here’s a step-by-step guide to applying dip powder nails at home: What You’ll Need: – Dip powder nail kit (includes powder, base coat, activator, and topcoat) – Nail file and buffer – Cuticle pusher – Rubbing alcohol (for clean up) – A small brush (optional, for excess powder removal) Steps: 1. Prep Your Nails: Begin by removing any old nail polish and filing your nails to your desired shape. Gently push back your cuticles and buff the surface of your nails to create a smooth base. Clean your nails with rubbing alcohol to remove any oils. 2. Apply the Base Coat: Start with a thin layer of the base coat. Be sure to cover the entire surface of the nail, avoiding the cuticle area to prevent lifting. 3. Dip the Nail in Powder: While the base coat is still wet, dip your nail into the dip powder at a 45-degree angle. Tap the finger lightly to remove any excess powder. Repeat for each finger. 4. Activate the Powder: After all your nails are dipped, apply the activator liquid over the entire nail to set the powder. This helps it harden. Wait a few seconds for it to dry. 5. Repeat the Process: If you want a thicker look or more vibrant color, repeat the base coat, dip, and activator steps once or twice. 6. Shape and Buff: After the powder has set, file and shape your nails to smooth out any unevenness. Buff the surface to create a flawless finish. 7. Apply the Top Coat: Finish with a layer of top coat to seal and add shine. Allow the top coat to air dry. 8. Clean Up: Use rubbing alcohol and a brush to remove any excess powder from the skin around the nails.  Conclusion Dip powder nails provide an excellent alternative to traditional manicures, offering long-lasting results, a variety of colors, and a healthier process compared to UV gels. By following the simple steps outlined above, you can enjoy a salon-quality manicure from the comfort of your home, with nails that look great for weeks.  

elegance, nails

Nail Foils Nail Art: A Trendy and Shiny Touch for Your Nails

Nail foils have become a popular trend in the world of nail art, offering a quick and eye-catching way to add some sparkle, shine, and creativity to your nails. Whether you prefer a subtle, metallic look or a bold, colorful design, nail foils can be used to create unique and stunning effects that elevate your manicure.  What Are Nail Foils? Nail foils are thin sheets of metallic, holographic, or patterned material that can be applied to the nails to create a shiny, reflective, and often textured finish. These foils come in a variety of colors, patterns, and finishes, such as gold, silver, rose gold, holographic, and even designs like animal print or marble. The foil is typically applied over a layer of adhesive or gel polish, and it can be easily pressed onto the nail’s surface to create intricate designs or simply add a touch of glam. Nail foils are commonly used to accentuate a manicure, cover the entire nail, or even highlight specific areas like tips, edges, or stripes.  How to Apply Nail Foils Applying nail foils is relatively easy and requires only a few materials. Here’s a step-by-step guide on how to achieve stunning nail foil designs: Materials Needed: – Nail foil sheets (metallic, holographic, patterned) – Base coat and top coat – Nail adhesive (or foil glue) – Tweezers or a small brush (for precise application) – Nail file and buffer – Gel polish (optional for a longer-lasting effect) Steps: 1. Prepare the Nails: Start by removing any old polish and gently push back your cuticles. Trim and file your nails to your desired shape. Buff the surface of the nails to create a smooth base for the foil. 2. Apply a Base Coat: Apply a base coat to protect your natural nails and ensure the foil will adhere properly. Let it dry completely before moving on to the next step. 3. Apply Nail Adhesive: Using a brush or applicator, apply a thin layer of nail adhesive or foil glue where you want the foil to stick. This can be on the entire nail or just certain sections for a more abstract design. Allow the adhesive to dry for a few seconds, but it should still be slightly tacky. 4. Apply the Nail Foil: Take a piece of your chosen nail foil and press it gently onto the adhesive-coated nail. Use tweezers or your fingers to press it firmly onto the surface. You can apply the foil in a full coverage style or place it strategically to create accents or patterns. 5. Remove Excess Foil: After applying the foil, gently peel off any excess foil, leaving the design on the nail. If necessary, you can use a brush or your fingers to smooth and adjust the foil placement. 6. Seal with a Top Coat: Once you’re happy with the foil design, apply a top coat over the entire nail to seal the foil in place. This step will help the foil last longer and prevent it from lifting. Be sure to use a non-wipe top coat if you’ve used gel polish. 7. Allow to Dry: Let your nails dry completely before handling them to avoid smudging the design. Why Choose Nail Foils? Nail foils offer several benefits that make them an attractive option for nail art enthusiasts: Easy Application: Nail foils are relatively simple to apply compared to other nail art techniques, and they require minimal tools. Versatility: With a wide range of colors, patterns, and finishes, nail foils can be used to create a variety of looks, from subtle and chic to bold and extravagant. Durability: When sealed properly with a top coat, nail foils can last for several days, making them a long-lasting addition to your manicure. Instant Glam: Nail foils instantly add a luxurious and shiny finish to your nails, giving them a glamorous and polished look.  Popular Nail Foil Designs Metallic Foils: Gold, silver, and rose gold foils are a classic choice for a chic, elegant look. Holographic Foils: These foils change color depending on the light and are perfect for a fun, eye-catching effect. Marble or Animal Print Foils: Patterned foils, like marble or animal prints, add an edgy and fashionable touch to your nails. Gradient Foils: Some people create ombré or gradient effects using different foil colors, blending from one to another.  Conclusion Nail foils are a fun and creative way to enhance your manicure, offering a shiny, reflective finish and endless design possibilities. Whether you want to add a little sparkle or create intricate designs, nail foils are an easy and trendy option to elevate your nails to the next level.

elegance, nails

Acrylic Nails with Nail Art

Acrylic nails are a popular choice for those who want long, durable, and strong nails. These artificial nails not only enhance length but also serve as the perfect canvas for a variety of creative nail art designs. When combined, acrylic nails and nail art provide endless opportunities for personal expression and style.  What Are Acrylic Nails? Acrylic nails are made by combining a liquid monomer and a powdered polymer to create a hard, protective layer applied over natural nails. This mixture forms a durable extension that is perfect for those with weak or short nails. Acrylic nails can be shaped into various styles, such as square, almond, or stiletto, and serve as a sturdy foundation for intricate designs. The application involves placing the acrylic mixture on the natural nail or a plastic nail tip. After shaping, the acrylic hardens through air drying or UV light, providing a smooth and strong surface for nail art.  The Allure of Nail Art Nail art has grown into a popular form of self-expression, allowing individuals to personalize their nails with different colors, textures, and designs. Acrylic nails provide a smooth, resilient surface, making them ideal for detailed, lasting designs that won’t chip or fade easily. Popular acrylic nail art designs include: Hand-painted Designs: Skilled artists can paint intricate patterns, from florals to geometric shapes or even portraits. 3D Nail Art: This technique adds embellishments like rhinestones, beads, or charms to create raised, textured effects. French Tips & Ombré Effects: Acrylics make the classic French manicure and ombré designs last longer, providing a smooth and durable finish. Nail Stickers and Decals: For easy application, nail stickers and decals can be placed over acrylic nails to add fun patterns or metallic accents.  How to Apply Acrylic Nails with Nail Art Here’s a simple guide to applying acrylic nails and adding nail art: Materials Needed: – Acrylic powder and liquid monomer – Nail tips (optional) – Primer and bond – Nail art tools (brushes, dotting tools, rhinestones) – UV lamp (for curing gel topcoats) – Top coat and base coat Steps: 1. Prepare the Nails: Remove old polish and push back cuticles. Trim and file the nails to create a clean surface. 2. Apply Primer: Use a nail primer to ensure proper adhesion of the acrylic. 3. Attach Nail Tips (optional): If desired, glue acrylic nail tips onto your natural nails and shape them. 4. Mix the Acrylic: Dip your brush into the liquid monomer, then the acrylic powder to form a bead. Apply this mixture to the nail, shaping it as you go. 5. Shape and File: After the acrylic sets, file the nails to your desired shape and smooth out any rough edges. 6. Add Nail Art: Once your acrylics are ready, use brushes, decals, or embellishments to add your preferred designs. 7. Finish with Top Coat: Apply a clear top coat to seal the design and cure under UV light if using gel polish.  Benefits of Acrylic Nails with Nail Art Acrylic nails with nail art offer several advantages: Durability: Acrylics are strong and resistant to chips and breaks. Customization: Nail art allows for a personalized and creative design. Longevity: Acrylic nails can last for weeks without losing their shine or design. Protection: Acrylics help protect natural nails and allow them to grow underneath. Conclusion Acrylic nails combined with nail art provide a stylish, long-lasting way to showcase creativity. Whether you opt for subtle designs or bold, intricate art, acrylic nails offer a durable base to express your personal style.  

Get Free Shipping on orders of PKR 5000 or more!Start Shopping

Price Based Country test mode enabled for testing United Arab Emirates. You should do tests on private browsing mode. Browse in private with Firefox, Chrome and Safari

Scroll to Top